Full Guide to Flexible Evaluations
Now that you've seen the power of flexible evaluations, here is a full guide on how to run flexible evaluations.
How to Run a Flexible Evaluation
Running a flexible evaluation consists of the following steps:
- Creating an external application and variant.
- Creating a flexible evaluation dataset.
- Adding a dataset and outputs to the application variant.
- Creating a Rubric with questions.
- Setting up the evaluation configuration
- Creating the evaluation.
Creating an external application and variant
The first step is to create a namespace for the application and application variant. This will represent the application and variant of the application that the evaluation will be run for.
This process is the same as the process for creating an external application. The easiest way is to do it through the UI under Create an Application.
For developers that prefer to do it through the SDK, instructions can be found here.
Creating a flexible evaluation dataset
Next, create the evaluation dataset. This is a special type of evaluation dataset in our platform that is different than the standard datasets that are manually uploaded or generated from knowledge bases.
This dataset can only be used for evaluations for external applications, and can only be done through the SDK. This dataset cannot be generated from a knowledge base nor can it be uploaded through the current UI. There are two special properties of this dataset that regular datasets don't have: Trace Views and Custom Metrics.
Trace Views
First, for each test case in this data, in addition to the regular input, expected_output components that are used to evaluate an application, users will also be able to upload the entire trace of an application that is able to be evaluated. This is ideal for developers that are looking to evaluate the entire process of an application. Each trace that is uploaded can be configured to show up in the annotation UI, and developers can utilize SGP's evaluation platform to have human and LLM annotators annotate questions targeting specific traces.
Example
TEST_CASES = [
    {
        "input": "Who is the first president of the united states?",
        "expected_output": "George Washington",
    },
    {
        "input": 1000000,
        "expected_output": "The number of dollars in a megadollar",
    },
    {
        "input": {
            "question_type": "who",
            "question": "Who is the second president of the united states?",
        },
        "expected_output": {
            "percieved_mode": "declaratory",
            "answer": "John Adams",
        },
    }
]
There are 3 test cases in this flexible evaluation. The first two are examples of the classic test case that has an input and a expected_output. In the Annotations UI, the annotator will be able to see them as components of the evaluation. The third one is an example of a new flexible evaluation. In the flexible evaluation, there are multiple inputs: question_typeand question, and there are also multiple outputs percieved_modeand answer. In this case, the user will be able to configure the Annotation UI to include sections for perceived_mode, answer, question_type, and questionrespectively if they want annotations to answer questions about these specific components. Refer to Setting up the evaluation configuration to discover how to configure the annotation UI and map specific components to questions on the rubric.
Custom Metrics
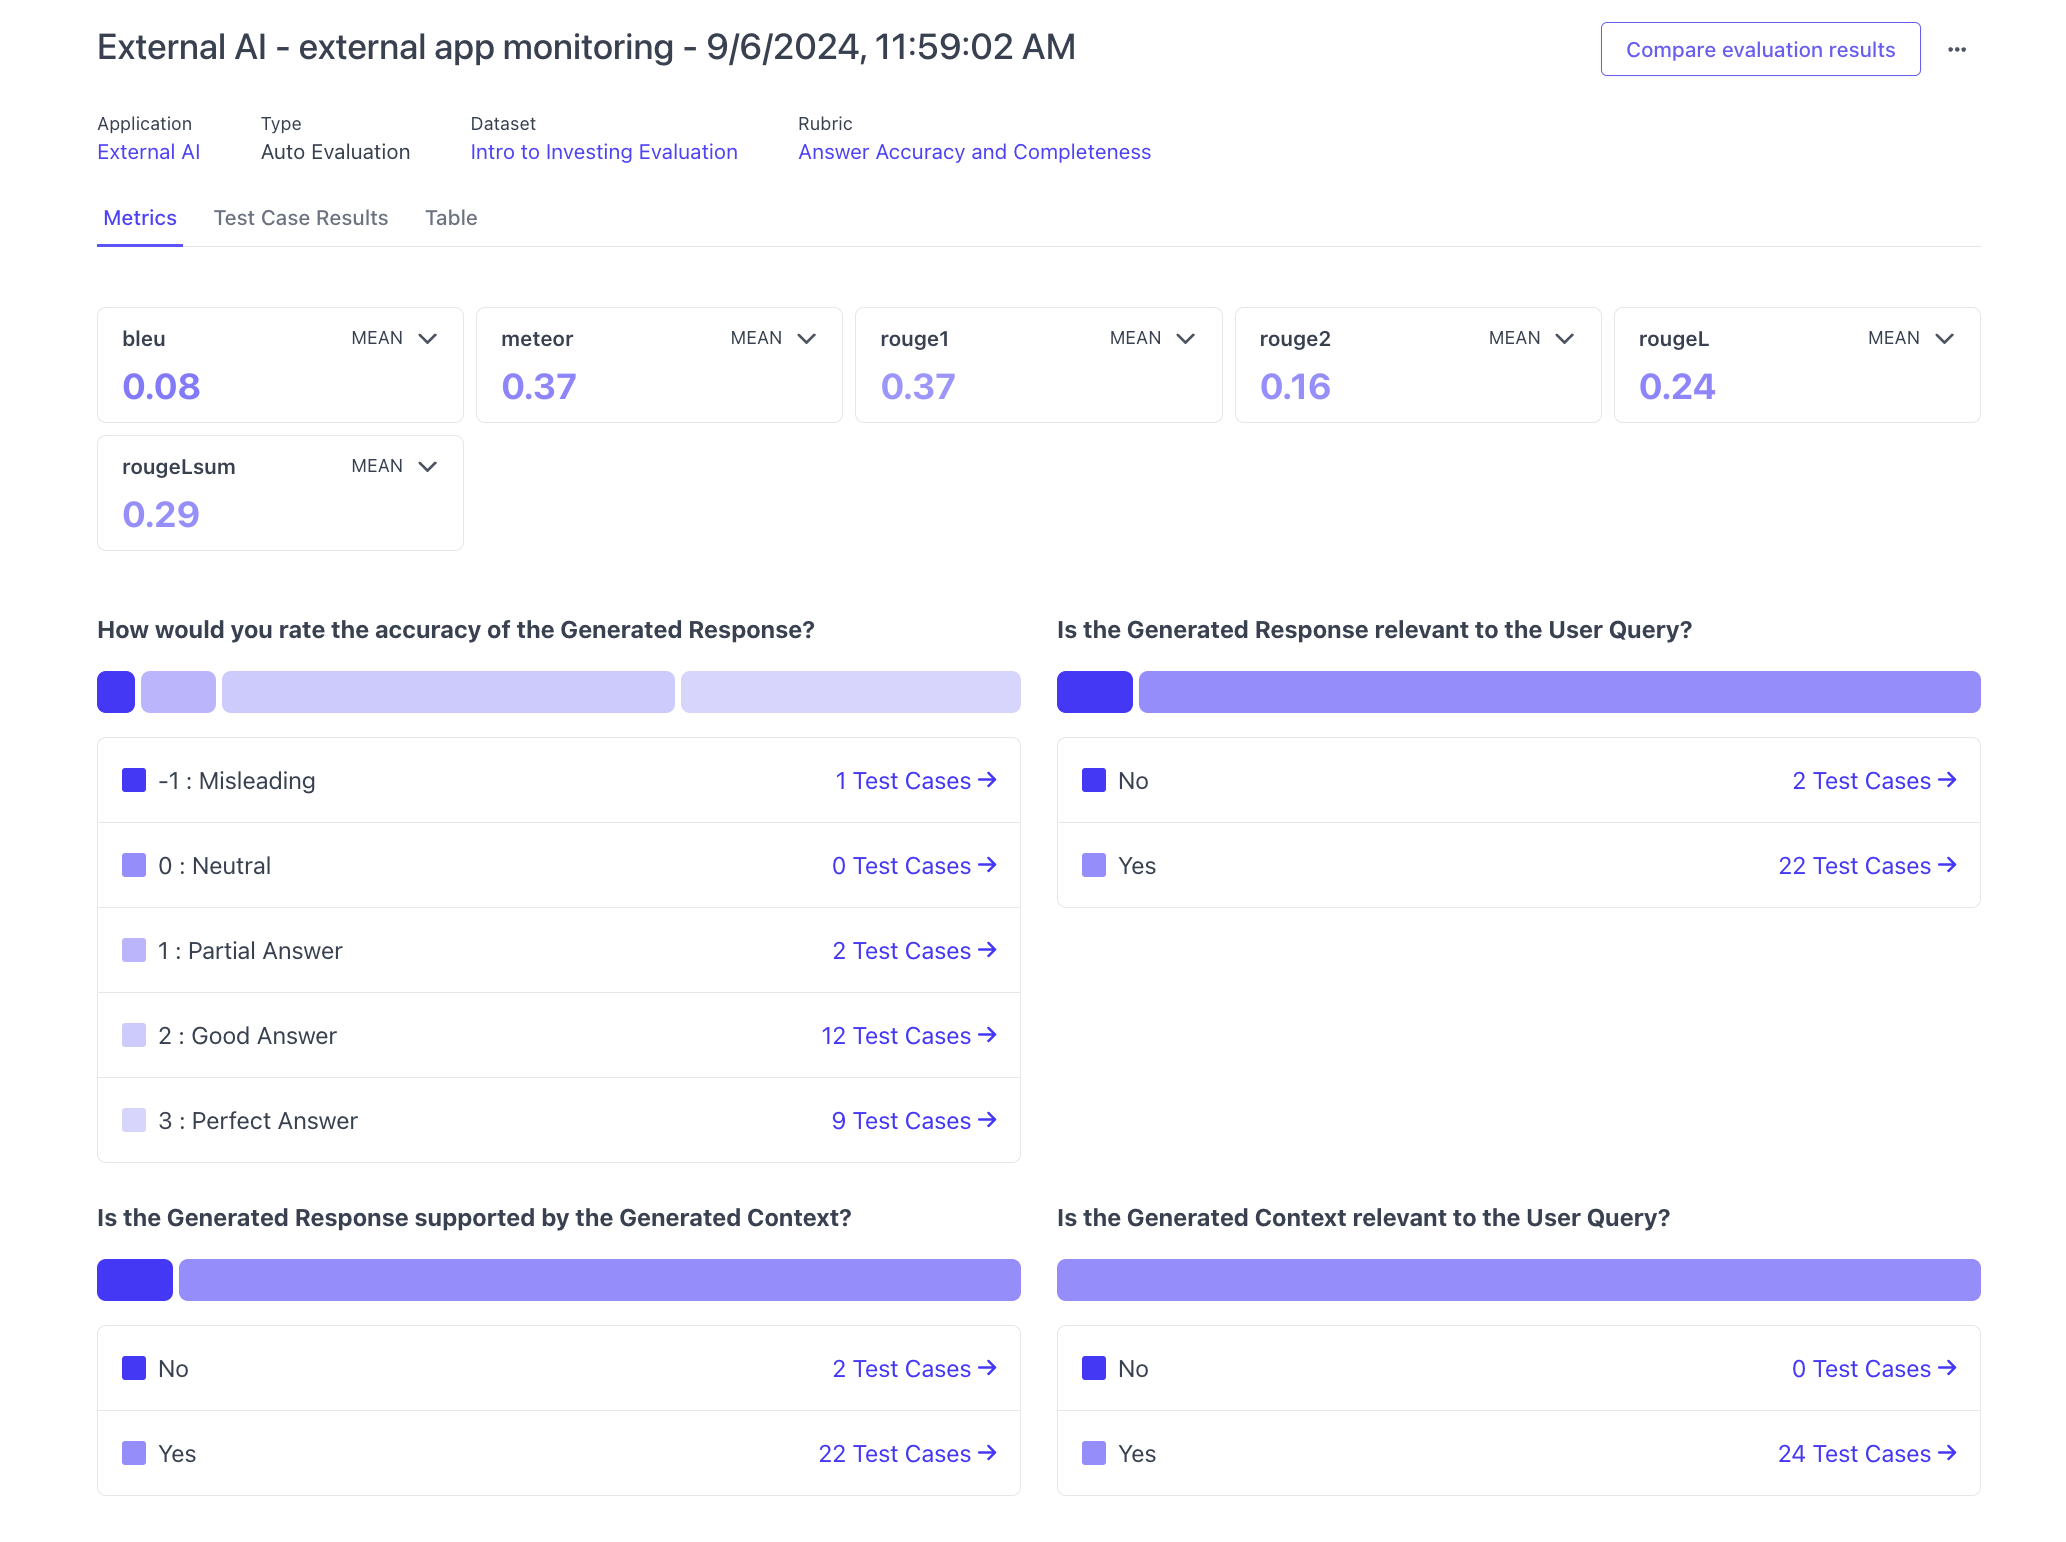
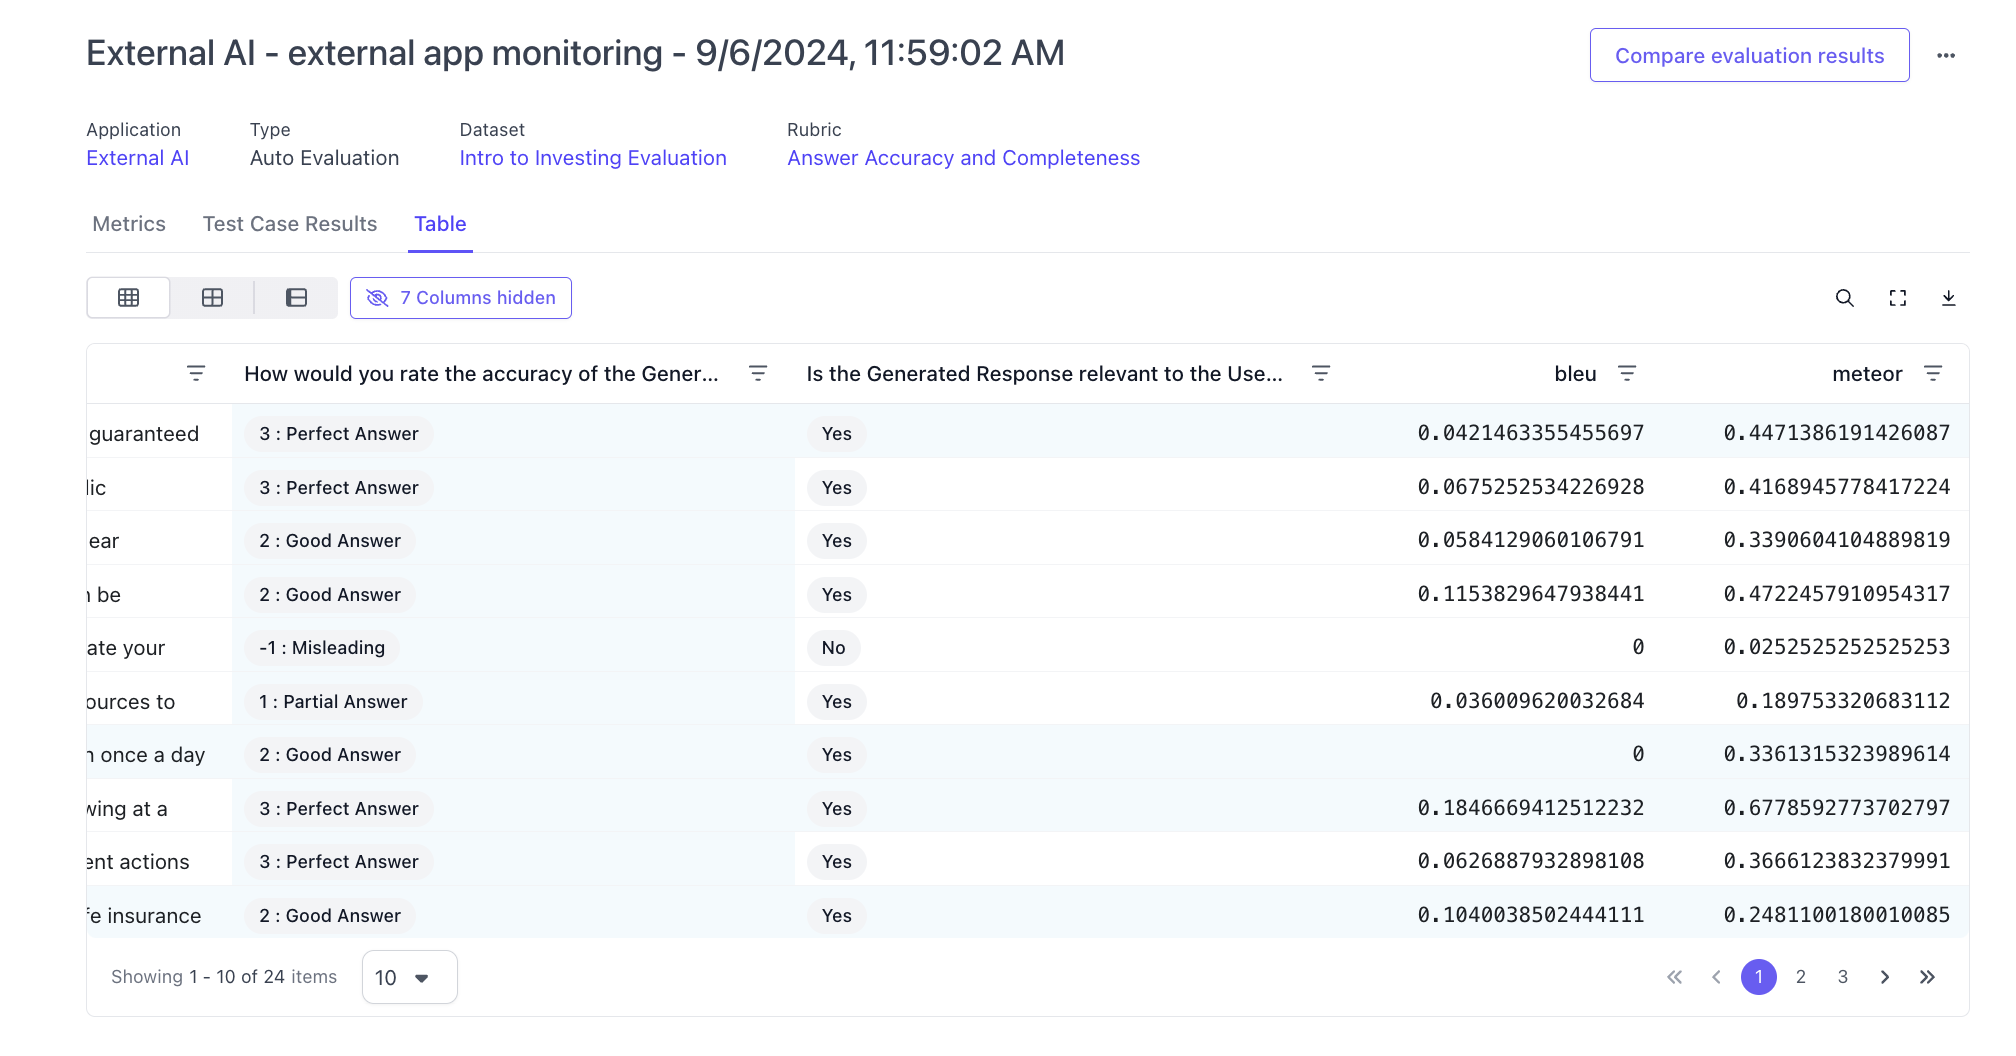
The second thing that is unique about flexible evaluations is that for each test case, users can also upload custom metrics to the test case. These custom metrics are useful for developers if they want an extra data point when reviewing annotation results of an evaluation. After an evaluation has been completed and the LLM (and/or) Human annotator has annotated the test cases, the developer can view the results of the evaluation alongside the custom uploaded metrics directly in our platform.
Example of how these metrics will show up for an evaluation run
Adding a dataset and outputs to the application variant
After the dataset has been created, the next step is to add a dataset and outputs to the application variant that was created above. This can be done through the SDK. After the dataset and outputs are uploaded through the SDK above, you can view the dataset and outputs on the application variant page on the platform UI.
Creating a Rubric with questions
Flexible evaluations use the same Rubric as all other evaluations. This means that question sets can be created and configured with either the UI or the SDK. However, the evaluation can only be run through the SDK (see below for instructions).
If there is already an existing question set that you want the evaluation to be run against, you can retrieve the question set through the id and run the evaluation through the SDK. If you want to create a new question set, you can either configure it through the UI and then retrieve the question set the same way as retrieving an existing question set. Or you can create one directly with the SDK.
Setting up the evaluation configuration
The magic moment of flexible evaluations shines through here. With flexible evaluation datasets, you will be able to customize two parts of the evaluation:
- Questions and Traces: Instead of the standard boxes for
Input,Expected Output, andOutput, having a flexible dataset will enable you to control the titles of each of the boxes users see on the evaluation screen.
- Annotation UI: Not only can you configure the content of what the boxes are, you will also be able to configure how they show up in the UI.
Annotation UI
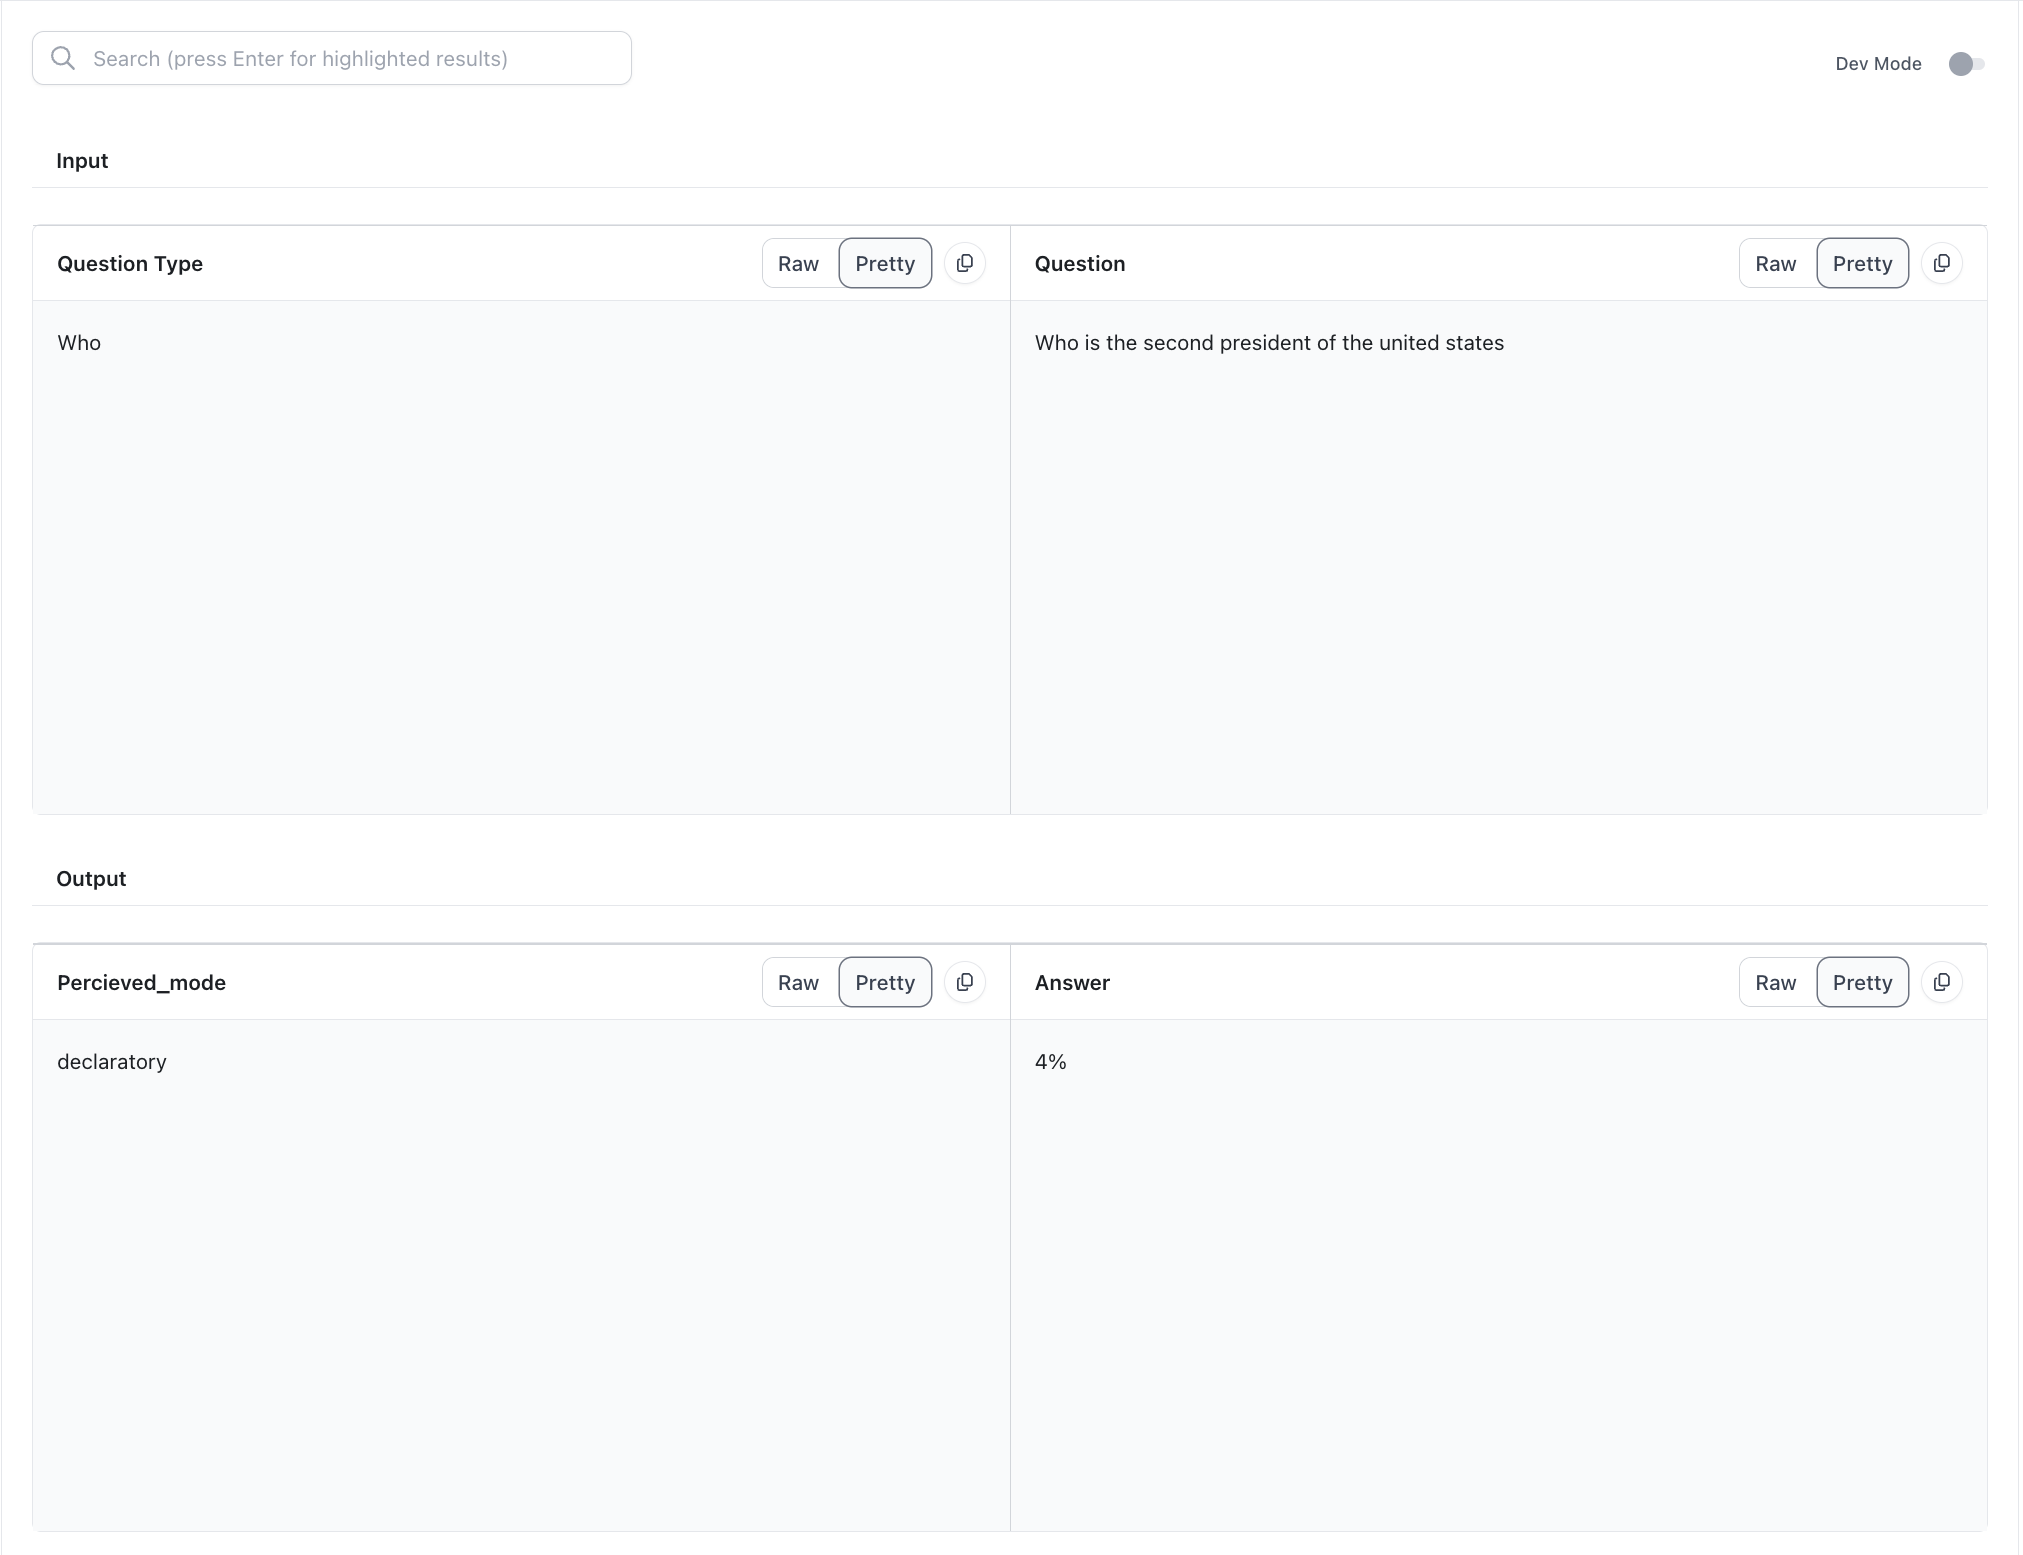
If we go back to the example above where we have a flexible test case, this is what the test case looks like when we created the flexible dataset.
TEST_CASES = [
    {
        "input": {
            "question_type": "who",
            "question": "Who is the second president of the united states?",
        },
        "expected_output": {
            "percieved_mode": "declaratory",
            "answer": "John Adams",
        },
    }
]
Users can choose to show specific traces in the Annotation UI for each question by configuring the annotation through the annotation_config_dict
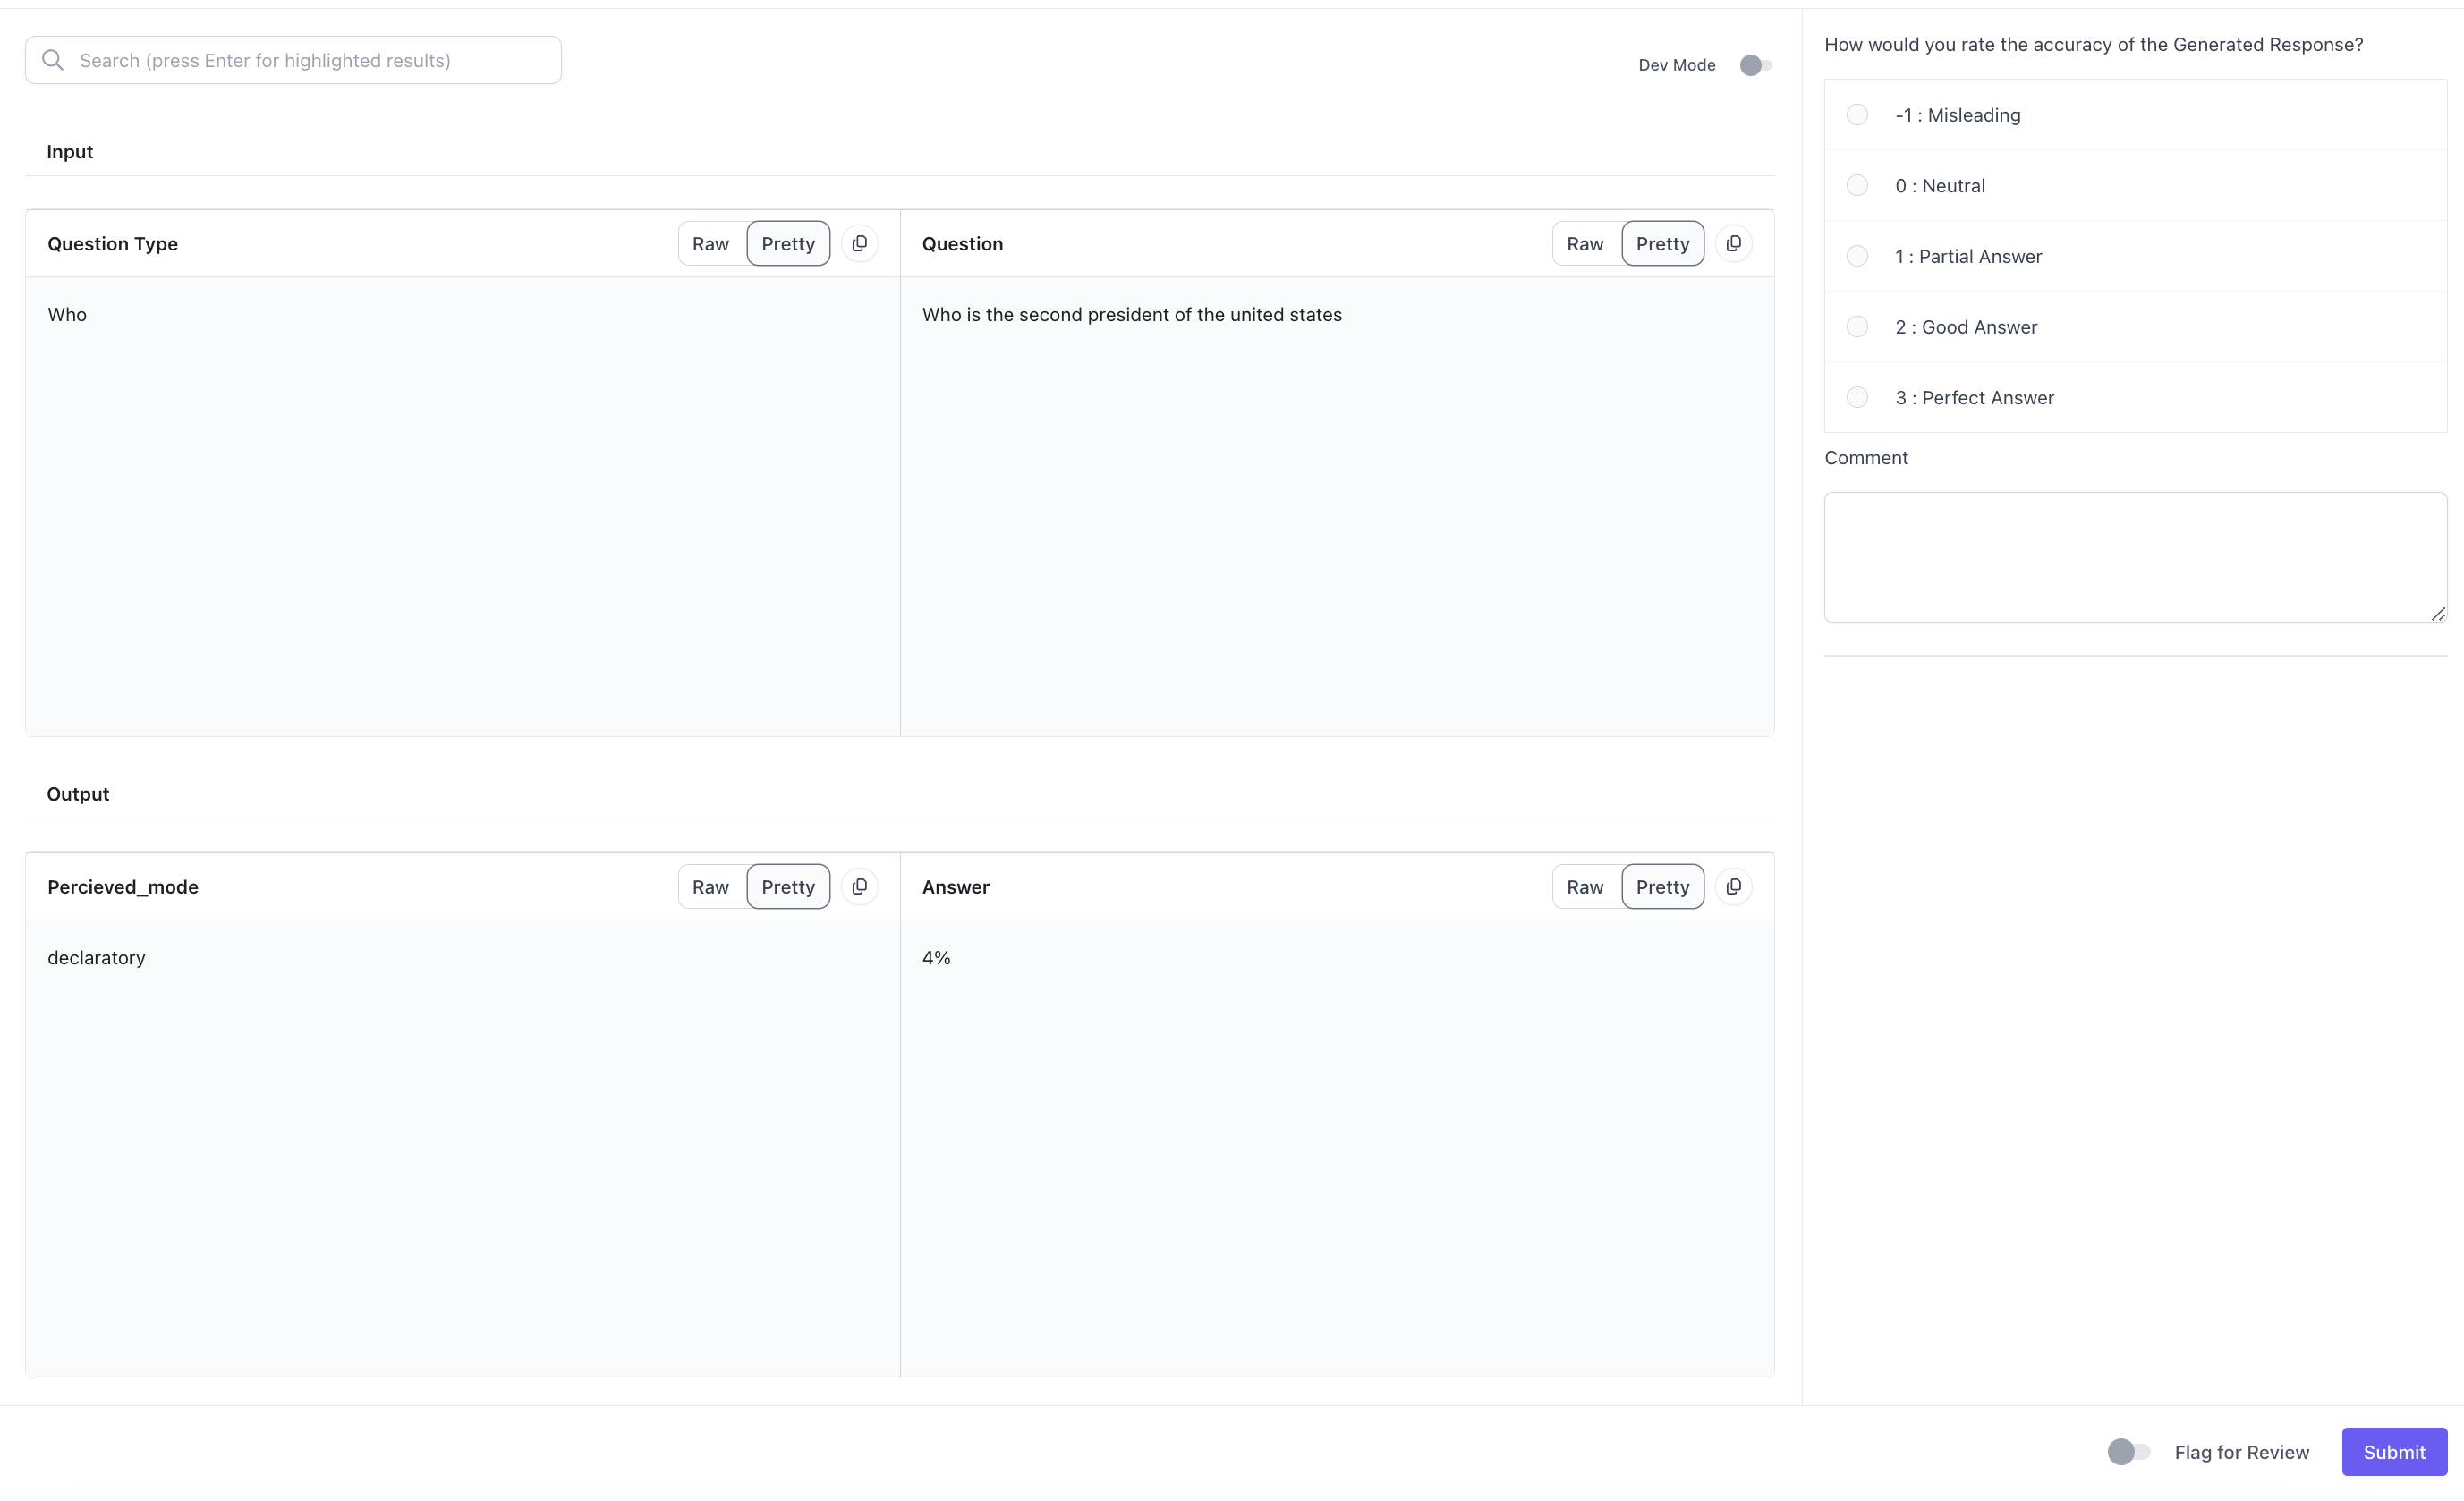
For example, the following configuration for annotations will create the following UI:
annotation_config_dict = {
    "annotation_config_type": "flexible",
    "direction": "row",
    "components": [
        [
            {
                "data_loc": ["test_case_data", "input", "question_type"],
            },
            {
                "data_loc": ["test_case_data", "expected_output", "question"],
            },
        ],
        [
            {
                "data_loc": ["test_case_output", "output", "perceived_mode"],
            },
           {
                "data_loc": ["test_case_output", "output", "answer"],
            },
        ],
    ],
}
One more thing that users can configure in the UI is if they want to have rows or columns. They do this with the directionkey. If the value isrow, then the items in the array will show up as rows in the annotations UI. If the value is col, then the items in the array will show up as columns in the annotations UI.
If a user selects row, the UI is limited to 2 columns.
If the user selects col, the UI is limited to 2 rows.
Questions and Traces
In addition to configuring the Annotations UI, users can also configure which traces will show up for which questions on the rubric with the question_id_to_annotation_config_dict object.
Going back to the original test case example, the following configuration means that for the first question in the rubric, the following traces will show up in the UI.
question_id_to_annotation_config_dict = {
    question_ids[1]: {
        "annotation_config": "flexible",  # NOTE: this has to be a flexible annotation config
        "components": [
        [
            {
                "data_loc": ["test_case_data", "input", "question_type"],
            },
            {
                "data_loc": ["test_case_data", "expected_output", "question"],
            },
        ],
        [
            {
                "data_loc": ["test_case_output", "output", "perceived_mode"],
            },
           {
                "data_loc": ["test_case_output", "output", "answer"],
            },
        ],
    ],,
    }
}
Creating the evaluation
The last thing to do after you've configured the evaluation is to run the evaluation. For flexible evaluations, only SDK support is available, so you would have to run the evaluation through the SDK.
Updated over 1 year ago